Custom Asset Packs
The Custom Asset Packs sidebar is the fourth topmost tab of the sidebar, which is available on the left side of the screen. From this tab you can configure custom image files to be used as an addition or replacement for Mannequin's built-in assets.
In Mannequin Character Generator, a Custom Asset Pack is a combination of multiple custom assets. Each assets represents what source image to be used and what image should be replaced or attached by this source, alongside other additional settings.
A newly created character will only have Default custom asset pack initially. Use the three dots icon on the right side of the custom asset pack name to switch between all of the available custom asset packs. From the drop-down menu that opens, you can also choose to add a new custom asset pack, rename the current custom asset pack, delete the current custom asset pack or manage all of the existing custom asset packs using a more granular interface.
Saving and loading custom asset packs are done through .mqna file. Loading a custom asset pack from a .mqna file will overwrite your currently active custom asset pack with the data obtained from the .mqna file. If you want to load a custom asset pack from file without overwriting your currently active custom asset pack, then you can click Manage Custom Asset Packs... on the drop-down menu.
Manage Custom Asset Packs
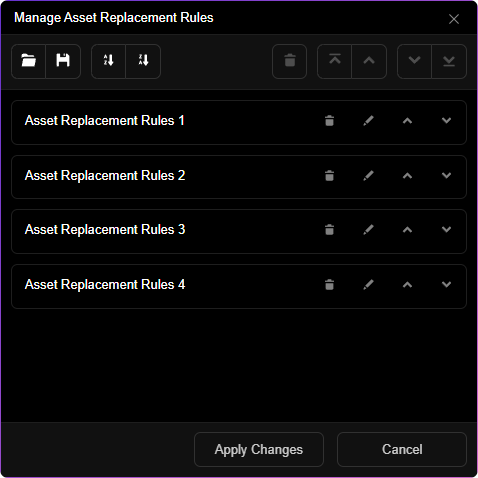
From the Manage Custom Asset Packs window, you can do various things, such as:
- Importing custom asset packs from external file.
- Exporting custom asset packs to external file.
- Sorting all custom asset packs by name, whether ascending or descending.
- Delete single or multiple custom asset packs.
- Manually adjust their order by moving up, moving down, moving to top or to bottom.
Clicking a custom asset pack will select it, and clicking again will deselect it. When multiple custom asset packs are selected, using the export function will save all of those selected custom asset packs into a single file. Custom asset packs imported from external file through this window will appear as new entries, rather than overwriting existing ones.
Adding A New Custom Asset
To add a new custom asset, click the Add Custom Asset button. A new panel will be created below, representing the newly added custom asset.
You can enable or disable this rule with the Enable This Custom Asset toggle. You can also remove this custom asset by clicking the Remove Custom Asset button.
Choosing Target Images
To choose target image (what image will be replaced), click Add Target button. A list will show up, displaying all of the currently used images. Hover over them to preview which one is which, then click to select. After selecting one, click Target Selected to confirm.
After selecting a target image, it will be listed in the corresponding panel. Use the three dot icon at the right side of each entry to show more options: Change Target, Remove Target, or Copy SVG file To.... It's highly recomennded to use the copy SVG feature as a starting line for your modification. It's also highly recommended to use Inkscape (free & open source) for editing these files, as other apps tend to be incorrect/unpredictable when working with SVG format.
Depending on what part the target image is representing, L and R toggle will also appear, which control whether the target image will be processed if it's on the left or right side.
Precautions for Assets with Meshes
Ignore this section if you don't plan to export to INX (VTuber model).
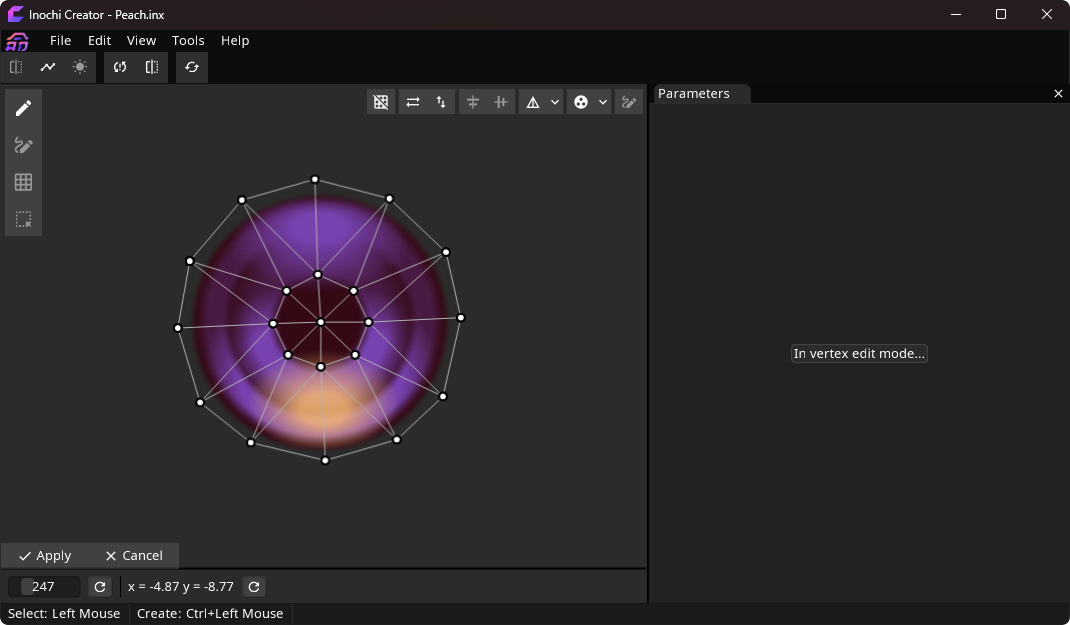
When choosing your target image, some entries will be marked with MESH tag. This means the corresponding part has mesh data assigned to it. For these parts, it's highly recommended to check out the mesh data first before replacing to avoid drawing outside mesh area. To do this, export first to INX and open the result in Inochi Creator.
After opening the file in Inochi Creator, find your intended target image in the Nodes panel, then click Edit Mesh to get a clearer view. In the example below, you can see an iris' mesh structure. Any drawing outside the mesh (the white wireframe) will be cut out, so plan out your replacement image accordingly.
Choosing Source Images
To choose source image (what image will be added or used as a replacement), click the folder icon and select your SVG file in the dialog that opens. You can enable Embed Source Image toggle to embed your SVG file into your character file, which will ensure that it works even though the original file is deleted/moved/renamed from your system.
You can also enable recoloring to recolor your custom SVG file based on Mannequin's recoloring rules. For example, if you have replaced the left hand part then it will be recolored to match your character's skin color settings.
In order for this recoloring to work properly, you must limit the colors used in your SVG file according to these rules:
| Part Category | Highlight | Base | Shadow | Stroke |
|---|---|---|---|---|
| Iris | #BD58A5 | #743174 | #2B072B | - |
| Inner Mouth | #DD6666 | #CC3333 | #660000 | #440000 |
| Other Body Parts | #FFEDE1 | #FFE4D1 | #F4AD9D | #AB5849 |
| Hair, Additional Hair Parts, Brow, Eyelash | #6B4839 | #563426 | #2D201C | #211B15 |
| Clothing, Hair Accessories | #4B5D7F | #3C4C72 | #131C43 | #0C1535 |
Other colors (same for every category): Backlight #F5F5F5, Pure Black #000000, Pure White #FFFFFF. Pure Black and Pure White will not be recolored by Mannequin.
You must also limit the SVG features used to these:
- Shapes must be Rectangle, Circle, Ellipse, Line, Polyline, Polygon or Path.
- Colors must be Solid Color, Linear Gradient or Radial Gradient.
If you're a bitmap artist, most 'tricks' won't work (like drawing using bitmap apps such as CSP/SAI/Krita then importing it to Inkscape via Trace Bitmap feature) unless you have proper understanding about vector images and SVGs!
Custom Asset Placement
Your custom asset can be placed in different ways relative to selected target images:
- At the front of selected targets.
- Behind selected targets.
- Replace selected targets.
If you have multiple custom assets with the same target image, the order of those custom assets become important. Custom assets are processed from top to bottom of the list, so if you have custom asset #1 and custom asset #2 replacing the same target image, only custom asset #2 will end up shown at the end.
Custom Recoloring Modes
Your custom asset can be recolored in multiple ways:
- Match Target will recolor the custom asset to be the same as target image. For example if you have a custom asset targeting a body part then the recolor will be the same as skin color.
- Independent will give you manual control for recoloring the corresponding custom asset.
- Match Other Custom Asset will recolor the custom asset to match other custom asset with 'Independent' recoloring mode.
TL;DR for Beginners
- Click the
Add Rulebutton. - Click the
Add Targetbutton. - Choose part to replace, then click the
Target Selectedbutton. - If you're planning to export to INX (VTuber model) and you've chosen a part that has mesh data (marked with
MESHtag), export first to INX and open the file in Inochi Creator to check out safe drawing area. - Click the three dot icon then
Copy SVG file To... - Edit the copied SVG file using Inkscape, make sure to use the same color palette.
- Save, then back to Mannequin. Click folder icon then choose your edited SVG file.
- Your edited SVG file will be used as a replacement.
- Play more with placement and recoloring to further adjust to your intended result.